Wednesday, June 22, 2011

Nuances of Conformation

Alright all you halter judges out there! Here's a great exercise that I think would be much more helpful in the model horse world. Below are three photos of horses the same age and breed (3-4 yrs old, Appaloosa). Place them in order as you would a halter class, and explain why.


Tuesday, May 31, 2011

Canter Cadence Question

Say that ten times fast!

So now that I have things starting to come together, I need to put the leg nubbies into a frame. A suggestion was made to put him on the ground, totally base and rod-free... which certainly appeals to me. Here is what I was originally thinking:
With the rear toe touching the ground, and a short acrylic rod in the down front foot for 3 points of contact. But, would people prefer something else? Here are some other ideas:
I'd be curious to get your thoughts on it!

Monday, May 30, 2011

The Muse

Having a long weekend turned out to be a really good thing, because not only did I get to make an armature and then cut it up, but I also mapped out a torso and leg-nubbies. "Leg nubbies" are, for lack of a better description, bits of wire with joints attached to them. Right now they are separate from the body, since they aren't strong enough yet to support the heavy mass.

This piece is drawn from my own selfish desire for a loping pleasure horse (who still will be coming, mark my words!). After sending some of my confidants pictures of what I envisioned, I was told that they wanted something bigger, more forward, and more versatile. So... that told me that I needed to do something other than a stock horse. I still want to do something cantering, since there are a million and one trotting horses out there; and still wanted to do something that will be performance friendly.

I will always have a soft spot in my heart for draft crosses. They have this charming, naughty quality about them. Prior to Leggs, I had a draft cross who rode like a couch. She was a point-and-shoot jumper that made it so easy to fly around a course, and being so smooth it was like riding a cloud. This is the type of horse I wanted to capture in this piece. I had tried a small classic-sized version almost 2 years ago (that never really got off the ground), but now I wanted to try it again with new techniques and a fresh outlook.

In hunting for reference, I came across this guy. He is *perfect*... the body type I was looking for (heavy but not too heavy), and a face that is just gorgeous-- reading immediately both drafty but refined. The soft eye is just perfect as well. This guy, Charlie, is going to be my muse for this next piece. Pics coming soon of the armature once the leg-nubbies are filled out and it can stand on its own!


And here is the pose for this handsome guy:
Base or no base? I personally feel no base in favor of (short) acrylic rods... but I definitely need feedback!

Sunday, May 22, 2011

Leggies all finished!


Slow to post this here, I know! But, since the last post still showed her headless and bald, I figured I needed to update it with a finished photo.

After she went up for sale officially, I got a lot of people asking of what size she was, for the purpose of seeing if she would fit regular sized tack. Needless to say, I went to my tackbox (which I haven't been through in about a year) and dug out my newest saddle. It was SUCH an unexpected joy to tack her all up. Dave came home to me playing ponies at the kitchen table... it was the first time he's seen me do this, and he just smiled. He knows how long its been and how I've been in a performance-showing funk for what seems like forever.Just like the real Leggs, she has the perfect face for a bosal!
My own copy of Leggs will be a portrait of the real little princess. Bay!! My favorite color. I am going to continue to experiment a bit and try painting her in oils. Why not, right? I do all my portraits on canvas in oils, but never tried it on a model. I figure if its going to be a disaster, it might as well be a disaster on my own model, LOL! I'll definitely show the progress here.

I want to I plan on focusing more on sculpting over the next few months to see what propagates. Leggs was created by literally cutting an armature apart and building her in pieces. I found that this gave me much more control over symmetry in her face as well as overall quality-control; I could fuss over one piece of her without getting overwhelmed by the rest of the unworked sculpture. There were some minor issues putting the pieces together (requiring some dremmeling and resculpting), but the overall result was WELL worth it, and by far I think that this process was successful. Now that I feel like I have a method that works well, I want to keep pushing. I will be building a new armature next weekend, and I'll post pics of that as well. I think you guys would find it interesting (mostly because its unusual) how I put it together and then cut it apart.

The hard part now is coming up with a rough concept. I have ideas floating around for what to do next, but nothing set in stone. The model of Leggs was a piece born out of my desire for a portrait of the real Leggs, and a burning desire for a walking stock horse that I can performance show. I think working from a live model gave this piece a down-to-earth quality, so I want to keep up that look now that I've found a sculpting method that works. I'd be open to any ideas...

:-)

Saturday, May 7, 2011

Slow... But Progress!


As I wait for her face to dry and get ready for assembly (yay ears!), I thought I'd snap a few more in-progress shots of the body of Leggs!

Since the last pics, I made a few changes. My goal is to capture a 4-5 year old mare, mature through her frame but still delicate in her features. I thought that the way I had it sculpted prior, she looked too gaunt over her back/withers; there just wasn't enough muscling. So, to give her more youthful appearance I raised her back and added further muscling across her hips and shoulders. I also filled in the rib lines since I don't think that was working and I'd rather have her nice and smooth through the belly.

Overall she still needs detailing, sanding, and overall prepping. Her head will (finally) go on this weekend and I can finish her general sculpting through her neck and throatlatch. From there she'll get some serious smoothing and finishing before her mane/tail go on. She will have a short, loose mane and long, natural tail.

If all goes as planned, I will be wrapping her up this month, then off to MVS to be cast! Details on that though will be forthcoming as I actually get her finished and I hear what the time-line is from the caster.


Sunday, May 1, 2011

May Day!

About a month and a half ago I started a fantastic new job as the Project Manager for a luxury home builder here in CT. Beyond the job description, they brought me on also due to my art background--and so I've been doing all their design work, website, and promotional materials.

This past week, my boss gave me a roll of blueprints on a house we are working on (we are in the framing
stage) and told me to stretch my creative capabilities... in order to do a color rendering of what the house will look like finished. I haven't done a lot of architectural paintwork (um... ever) and with just the general idea of what it would look like in the prints, sat down to start laying out the lifework, followed by mixing colors, and figuring out shadows. After working on it all week, Friday I was able to snap this photo with my iphone to really look at what had come together. While not a great photo by any means, I think its good enough to share!

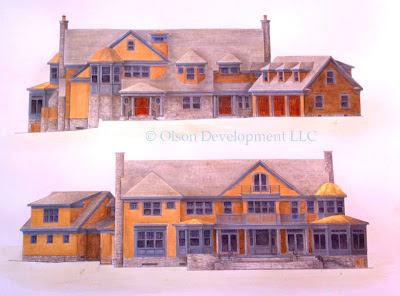
It will be getting scanned this coming
week in order start using it for promotional purposes. The size is 28"x28", and the copyright was added and not on the original piece.

Its been a long time since I've done a complete watercolor... actually, I haven't touched my watercolor paints for about 5 years, back when I was doing much more portraiture. This particular piece was an interesting challenge to say the least. What made it difficult was that there were no reference photos, just notes on what each component was made from (cedar, blue color swatches, copper roofing on the bells, etc)... so everything had to be cross referenced with the blueprints, and then also my boss who can see the finished house in his head. He seemed quite pleased with the results.

Being able to sit and paint like this was both mentally exhausting and hugely satisfying. It has me creatively inspired in all sorts of ways, and now that the studio is back to a workable space, I have all sorts of projects lined up to get finished. I also have put the website back up again (www.PhazeStudio.com) so that people can access the archives until I get the new site up and ready to launch. I have high hopes for May... I have to keep this spring momentum going. There are things to do! And things to create!


Monday, April 25, 2011

Illustrations that inspire...

I came across this illustration when looking for pictures of miniature schnauzers for a portrait project. It both captivated and disturbed me... to where I felt compelled to keep it... and share it with all of you!

I am not sure who the artist is, so if you know, certainly chime in.

Enjoy!