Tuesday, December 29, 2009

Surviving the holidays

I'm in the clear! Now that the gift-giving holidays are over, I have some time to sit down and regroup. You see, every year I tell myself I will not take on any last minute projects in time for the holidays. And every year, I do anyway... resulting in a caffine-induced stupor, pulling all-nighters to get everything done on time. Ah, reminds me of college....

This year I had three photography shoots, two portrait models and an actual portrait. It was a holiday full of mixed emotions, since some of these gifts were spurred by the death of my filly's father, Henry. Henry was an extraordinary gentleman, and his tragic death send a ripple through the farm and those who knew him. The saddest part was the revelation that his owners, the Shepards, had no good photos to remember him by. And so seperately, the two of them commissioned me to do related gifts, for each other. The first were the photoshoots, one of each of Henry's babies, and then some holiday shots.

Here are the babies: Legs (my little girl), Barbie (who belongs to Mrs. Shepard), and Callie (other bay filly). There is also Murphy, Barbie's full brother, but being a yearling, he was a goober for his photoshoot. Then we did a few holiday pictures. All the mares are SUCH hams! They loved every minute of their glamour shots.


The portrait was of Henry himself. It is 22x28" in oils.

It has been nearly a year since I've painted on canvas, and I didn't realize how much I missed it. It was so nice to paint without limits-- no need to worry about brushstrokes or anything else-- just me, my palate, my reference pics... and whatever comes off the brush. After completing it, I know that I need to be doing more portraiture again. So, my books are open for portrait painting once more.

I will share the portrait models tomorrow. One of which is a portrait of Barbie, leopard mare. It came out GORGEOUS! I hope to borrow her for a show or two, hehe!

Tuesday, December 15, 2009

Coffee anyone?


I got this photo from some friends who decided to end a chilly afternoon trail ride with some hot coffee and donuts. Spot seems to be checking out the "anytime eating" menu... I wonder if they decided to try the veggie flatbread or if they stuck with munchkins.

The holiday is bearing down on me fast and so I don't have much time to be on the computer. Or sleep, for that matter. It looks like studio-cat (now named Paul), has become quite comfortable in my absence. He was actually annoyed with me that I turned on the light to take the picture. I can't wait to be done with all my projects and life can return to normal!

Wednesday, December 9, 2009

Lesson #2... Don't freak out

Or, if you do have to freak out, then set the horse aside until you regain your composure. The worst thing you can do in... well, any situation, really... is freak out and then rush into something you shouldn't.

In this case, you MUST let the matte finish dry... as hard as it is to see your lovely pony all awfuled up, don't touch it. Resist the urge to poke it with your fingers (or anything). Let it sit... Overnight is best, since that way there is no doubt that it will be dry. If you try to mess with it too soon, you could pull the paint up right down to the resin! AGH!! And then THAT would be a really tricky mess to fix. Trust me on this one... self control was a tough one for me to learn.

In the morning, you can start the task of fixing the horse. The good news: its fixable. And, you don't have to strip the horse. The bad news: you will have to do some repainting. And it requires patience and more of not freaking out. But, hey--you didn't have to start completely over, right? That's a good thing!

First, take a very fine sandpaper and buff the afflicted areas. On this lady, it was pretty much everywhere. This is a VERY light buff; its just to take off the worst of the offenders and do a light smoothing. Clean off all the extra powder from sanding (I use a blush brush) and then... and I am not crazy... Hit the offending areas with Krylon Gloss. Use an even, but not too thick, coat. The goal is to fill the wrinkles but not obsure the sculptural detail. Because the gloss is thicker than the matte finish, it will give you a huge head start in evening out all the imperfections.

The next step is similar to the first, in that you need to wait a day until the gloss is totally dry. Then, take out the fine sandpaper and sand all over. You can be a bit rougher with this round of sanding; the gloss coat will protect the existing paintwork. Your goal is the remove all the texture from the wrinkles. Basically, you are smoothing them down. You'll still see them, but at this point in time, you don't want to *feel* them. Run your finger over the areas until it feels smooth.

If you have very bad areas, where the wrinkle has been forced upward like two techtonic plates, creating a horrible wrinkley mountain chain... then sand it down as best you can, gloss just that area, and sand again. By the second time around, it should be nice and smooth. Most wrinkles melt away though in the first shot of gloss.

Alright. Now that the horse is buffed to a baby-bottom smoothness, you can touch up the areas. In my case... that was pretty much the whole horse. Looking at the bright side... I only needed two coats in most areas, and I didn't have to strip and repaint her. Woot!

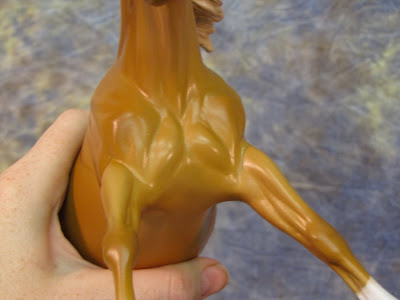
Here is a closeup of the wrinkled area after the repair. At this point, I can go back in and start re-applying the shading. You do not have to repaint all the areas you've sanded. When you apply the next coat of matte finish, the scratches you see will melt away. This is why its important to use a fine-grit sandpaper; you are buffing the surface, not gouging it.
After the touchups, seal her again with the SAME can of matte finish that gave you the problem in the first place. This is important since it will prevent the same thing from happening again. If you use another can, you may have another chemical reaction and experience a whole new wrinklage... and that would probably REALLY cause a freak out. The gloss is an excellent sealer, but I'm not one to take chances. Mist the horse first with the matte finish. Let that dry. Then mist again. Don't spray it heavily!! Just keep misting until you feel satisfied that its sealed.
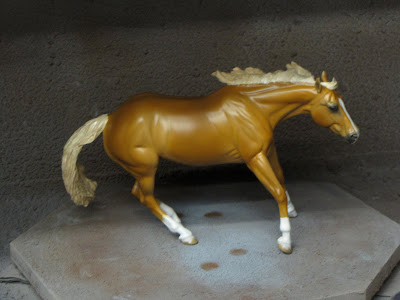

At last!!! Repaired. Pics of her finished will come tomorrow. :-)

Lesson #1...

"Always complete a horse with the same can of matte finish you started with."

Why is this so important? Well... because this could happen. Go ahead, blow it up to full size for the full horrific experience!

This is an Eberl Oktopussy (the reining horse) that I had completed as of last week. She is golden palomino and came out just brilliantly... all she needed was a final coat of matte finish.

While working on a different project, the can I had got used up. No problem, I thought to myself, and went to the store to get a fresh can. I didn't think much of it, as I've done this before.

I shook the can, and started spraying. Immediately I smelled that the spray was different-- much more chemically-- but at that point it was too late. The wrinkling had begun, ALL over her body. All I could do was watch in horror as weeks worth of work went down the toilet as she crinkled and wrinkled. There were many tears, and a bit of swearing.

After coming to terms with what had happened, I made a phone call to Krylon. The feeling of the phone call was similar to the one I made to Plasticote when my favorite primer suddenly was different. "WHY is the formula different? And you couldn't have put something like that on the new cans? Because its definitely not compatible with the old cans, and I just ruined a piece of artwork since your company failed to disclosed that they changed the chemical formula."
And that was basically the gist of it. Krylon has changed the formula in the matte finish (AGAIN).

The solution for us, who use it: buy several cans at a time, to insure they are all from the same batch. These cans you can use interchangeably since they will be the same formula. ALWAYS finish a horse with the same can you started with. If you can't, then spray a VERY light coat of the new can to prevent wrinkling from potentially happening. Or, do test sprays!! Have a guinea pig horse who is painted even in just a basecoat that you can test spray on. My personal favorites are FAS's. :-)

As for the Okto... I spent most of the past 2 days repairing her so that I can do touchups. I will post today the step-by-step on how to repair wrinkles without having to strip and repaint the whole horse.

Thursday, December 3, 2009

Long days!


If ever there was a face to describe a long day... this is it!

While all the dogs take their "work day" very seriously, Lady is the one that gets most excited about the trip to and from the studio. As soon as the back door closes, she assumes the "travel position": smooshing her face in-between the headrests... and as soon as the car starts rolling... falling fast asleep.

Hayden, however, is more of a snoozer once he gets to the studio.

We all have been spending a lot more time at the studio now that the holiday rush is upon us. While I paint and sculpt, the dog-children are in charge of "NR&D"... that is... "Nap Research and Development". Yea... I'm not sure where the saying "working like a dog" came from... since I would gladly switch jobs with them any day!!

I've been quite pleased of the latest pieces that I have been working on. This Hazel was a joy to paint.... her owner basically gave me the reins on her, and it was wonderful to run with an idea. This was the result!

Her feet I was especially proud of. Previously, I had been doing feet with verticle striations. However, they needed something-- the horizontal striations-- to make them more realistic. I had tried several ways to do it, but none really created a convincing result. I am not sure why it had never occured to me before, but by doing the horizontal ones first in washes, and then using similar washes to do the vertical ones, I get the perfect balance. Any further details can be added with pencils (either oil or watercolor). The finished hooves look amazing!

From now on, all hooves will be looking like these lovelies. The next piece will have dark hooves, and I will be sure to post pictures of them as well!